Ontario's Plain-English Guide to Custom Home Building📞 705-533-1633 | ☎️ 1-866-868-6606 | ✉️ info@icfhome.ca
Ontario Lot Grading and Drainage Requirements
Ontario – 2026
Lot grading + drainage
New-home blueprint
Ontario lot grading and drainage requirements: a clear blueprint for new homes (2026)
If you’ve ever wondered why municipalities obsess over “swales” and “finished grade,” here’s the reason: water is extremely motivated. It will find the lowest point on your lot, invite all its friends, and then politely introduce itself to your basement. Lot grading is the easiest, cheapest way to keep that from happening. This guide explains Ontario lot grading and drainage requirements in plain English for 2026 – what the Building Code expects, why municipalities require grading plans, when you’ll see deposits and certificates, how conservation authorities get involved, and the step-by-step process that keeps your new home dry and your neighbours friendly.
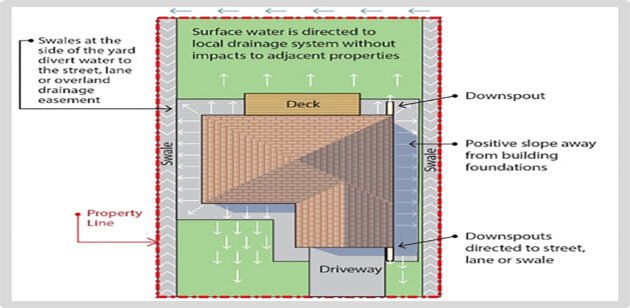
What “lot grading” actually means
- Finished grade: the final elevations of soil around the house and yard.
- Surface drainage: directing rain and snowmelt so it won’t pond beside the foundation or flow onto neighbours.
- Swales: shallow channels that guide water to a safe outlet.
- Low points and catch basins: where water is collected (if required) and routed to an approved outlet.
- Downspout discharge: where roof water goes – a big deal people treat like a small deal.
Builder truth: most wet basements start outside the house, not inside it.
Why this matters in 2026
Ontario municipalities are getting stricter on drainage because infill is tighter, lots are smaller, extreme rain events happen, and nobody wants stormwater disputes turning into neighbourhood drama.
Expect grading and drainage to be reviewed as part of building permits – especially in serviced areas, infill, subdivisions, and near regulated lands.
1) The Ontario-wide rule: don’t let water accumulate at or near the building
While lot grading is heavily municipal, Ontario has a core Building Code expectation that drives everything: the building should be located, or the site graded, so water won’t accumulate at or near the building and won’t adversely affect adjacent properties. That’s the spirit of the OBC’s surface-drainage requirements, and it’s why inspectors and plan reviewers care about grades.
Pair that with foundation drainage (perimeter drainage / weeping tile where needed) and you get the two-layer defence for basements: surface water stays away, and subsurface water has a controlled path. When both layers are done properly, basements behave. When either is ignored, water does what water does – shows up uninvited.
Surface drainage (first line of defence): the idea is simple – don’t create low spots near the foundation where water can pond. Grade should direct water away from the building and away from neighbouring properties.
Foundation drainage (the backup plan): where required, drainage is provided at the base of the foundation walls that enclose the building interior, giving below-grade water a managed escape route.
If you remember one sentence: keep surface water moving away from the foundation, and give subsurface water a legal escape route.
2) Why municipalities take grading seriously (it’s not “just landscaping”)
Municipalities aren’t micromanaging your yard decor. They’re preventing basement-seepage claims, sidewalk icing, flooded neighbour yards, overloaded storm systems, and erosion into waterways. A grading plan is basically the municipality saying “show us your water plan.”
In many Ontario communities, grading and drainage review is tied to building permits, site alteration permits, site plan approval, and subdivision agreements. That’s why you’ll hear terms like “approved lot grading plan,” “as-built grading,” “certificate of finished grading,” and “grading security.”
Subdivisions – the master plan controls your lot: a master grading plan is part of the engineering design, and your individual lot plan typically must match the subdivision’s approved drainage concept (swales, outlets, elevations).
Infill – extra scrutiny because you’re surrounded: infill homes can trigger more grading review because drainage changes affect adjacent properties immediately. Many municipalities handle infill grading through site alteration permits and security deposits.
Grading and drainage is site work – get it done right by the crew that does it every day.
Rough grade, swales, drainage, and final grade are exactly what Georgian Bay Siteworks does – our own excavation crew across Tiny, Tay, Midland, Penetanguishene, Wasaga Beach, Collingwood, Springwater, Oro-Medonte, and Barrie. We can set the site up so it passes the grading certificate the first time and your basement stays dry. Tell us the lot and we’ll price it. No charge to ask.
3) The two big deliverables: the grading plan and the certificate
Building a new home in Ontario, you’ll usually meet these two documents in some form:
A) Lot grading plan (designed): the “what we intend to build” drawing – proposed elevations, slopes, swales, high and low points, and where water goes. Depending on the municipality and project type, it may need to be prepared or stamped by a qualified professional (often a P.Eng or OLS).
B) Lot grading certificate (verified): the “we built what we promised” confirmation after construction. Many municipalities require a final certificate before releasing grading securities or closing the file.
You’ll see this plan-then-certificate approach across Ontario: some municipalities require a final lot grading certificate for new builds or infill, and many tie grading to deposits and permit closeout. The paperwork varies, but the structure is consistent: design it, build it, prove it.
4) Deposits, securities, and the myth of “free money”
Grading deposits (or securities) are common in Ontario, and they exist for one reason: to make sure the final grading is actually completed as approved, and not “mostly done” with a few mystery low spots left behind. The deposit is typically held until grading is certified and the municipality is satisfied.
Deposit amounts vary widely. Some municipalities require deposits as part of the building permit process (often a few thousand dollars per lot) and may deduct review fees from that deposit. The numbers change by municipality, project type, and whether you’re in a subdivision or an infill scenario. The important thing is to budget it and plan for the release steps.
A grading deposit is like a teenager’s phone: yes, it’s technically yours, but you only get it back after conditions are met.
5) Conservation authorities and regulated areas: when grading becomes “development”
If your lot is near wetlands, watercourses, valley or stream corridors, shorelines, or hazardous lands, you may be inside a regulated area. There, grading, filling, or altering the site can require permission under conservation-authority permitting rules. This is where homeowners get surprised: “but I’m just shaping my yard” can still count as regulated activity if it’s in the regulated zone.
In 2024, Ontario consolidated conservation-authority permissions under a single new regulation, Ontario Regulation 41/24 (in effect April 1, 2024), which replaced the old individual authority regulations and actually narrowed some triggers – for example, the regulated area adjacent to provincially significant wetlands was reduced. Local authorities now administer permits under that framework. Practically: check early whether you’re regulated, and get written confirmation if a permit is not required.
If you’re regulated, do this first: contact your local conservation authority, confirm whether your property is within the regulated area, and ask what activities require permission (grading, placing fill, altering drainage routes, and so on).
Why this matters for building permits: conservation-authority clearance can be Applicable Law for a building permit. If it applies, your permit can stall until the clearance is provided.
6) The grading blueprint for new homes (step by step)
Here’s the workflow I recommend for a new-home lot in Ontario – subdivision, rural lot, or infill. It keeps approvals clean and prevents costly rework.
Step 1: Start with the survey and constraints.
Use an OLS survey and identify easements, drainage features, and any regulated areas. If you’re serviced, note storm and sanitary locations. If you’re rural, identify ditches, outlets, and any conservation-authority considerations.
Step 2: Get the grading plan designed early – before you set foundation elevations.
Foundation elevations should be set to work with drainage. If you guess elevations and figure grading out later, you’re gambling. Good grading starts with correct building height and finished-floor elevations relative to the lot.
Step 3: Confirm where water is allowed to go.
In subdivisions, water often flows through swales to a defined outlet. In urban serviced areas, storm connections may be required. In rural settings, municipal ditches or controlled outlets are common. The rule: don’t invent your own outlet.
Step 4: Rough grade during construction – don’t leave it for the end.
After backfill, establish a rough slope away from the foundation so rain doesn’t pond beside the house. This matters most before winter freeze-up and before long rainy stretches.
Step 5: Manage roof water and below-grade entrances.
Downspouts should discharge away from foundation walls and toward approved drainage paths. If you have below-grade entrances or window wells, the drainage details matter – these are common failure points.
Step 6: Final grading and certification.
Place final topsoil, shape swales, confirm low points and outlets, then obtain the final grading certification if required. This is usually what triggers deposit release and file closure.
7) Common grading mistakes (the greatest hits)
To avoid basement moisture, neighbour complaints, and regrading costs, avoid these classics:
- Negative grade: soil slopes toward the foundation instead of away, so water collects at the wall and finds a way in.
- Swales filled in because they “look weird”: swales are often required to carry water off the lot safely.
- Downspouts dumping at the foundation: roof water is a huge volume in a storm – put it where it belongs.
- Hardscape added later without a drainage plan: patios and driveways can redirect water toward the house or onto neighbours.
- Topsoil too high at the siding: landscaping that bridges clearance zones causes moisture and durability problems.
- Window wells without drainage: a window well can become a bucket, and buckets fill.
Builder tip: most “mystery leaks” aren’t mysteries. They’re gravity doing its job.
Building on a lot? Budget the grading before it surprises you
Grading, drainage, deposits, and site work are exactly the costs that blow a new-build budget. These two books plan the land and the permits so nothing hides. Each $29.99, or both for $49.99.
For your lot
The Ontario Lot-Buying Bible
Prove a lot is buildable – and budget it – first.
$200+ of pro advice$29.99one-time
Grading, drainage, and site work are top ways a rural or infill lot blows its budget. This 28-page step-by-step budgets the whole build the way the money flows – land, site, well, septic, hard and soft costs, and a real contingency.
- Site-work, well, and septic cost planners (grading included)
- The hard-cost / soft-cost / contingency worksheet
- The 10-minute go/no-go lot test and printable scorecard
- Bonus chapters: DIY trades, wells, easements, negotiation
30-day money-back guarantee.
Get the Lot Bible – $29.99 →
Secure checkout – download in 2 minutes – yours forever
For the permit
The Ontario Building Permit Bible
Run the file, including the grading plan.
$10,000$29.99one-time
Everything a builder does to run a permit and pass inspections – the order of operations, the complete-application checklist (grading plan and drainage included), real 2026 fees, and how to never fail an inspection.
- The complete-application checklist, so the file doesn’t bounce
- How grading, deposits, and certificates fit the permit
- Real 2026 permit fees and what triggers them
- How to never fail an inspection – and the costliest mistakes
30-day money-back guarantee.
Get the Permit Bible – $29.99 →
Secure checkout – download in 2 minutes – yours forever
Building the whole thing? Get both Bibles.
Budget the land and the site work, then run every permit – grading included – without the guesswork.
$59.98 Both for $49.99
Get both Bibles →
8) How municipalities review grading (what they’re actually checking)
Reviews vary, but municipal reviewers usually look for the same core logic:
| Reviewer focus | What it means in real life | How you avoid problems |
|---|---|---|
| Water won’t pond at the building | Finished grade slopes away so water can’t sit by the foundation. | Set elevations early; rough grade after backfill; keep low points away from walls. |
| Neighbouring properties aren’t harmed | No dumping water onto adjacent lots or creating new flooding paths. | Follow subdivision swales and outlets; confirm lot-line drainage intent. |
| A safe outlet is provided | Swales and catch basins route water to an approved municipal or engineered outlet. | Don’t invent routes; tie into the approved drainage concept. |
| Regulated areas respected | No grading or fill within regulated hazard zones without permission. | Check conservation-authority mapping and get written clearance. |
9) New-homeowner field checklist for grading day
Walking the site (or supervising your contractor), use this quick checklist:
Around the house
- Grade slopes away from the foundation on all sides.
- No low bowls beside window wells, stairs, or downspouts.
- Topsoil height respects clearances at the wall – don’t bury materials that shouldn’t be buried.
- Downspouts discharge away from the foundation and toward swales or outlets.
Across the lot
- Swales are shaped and continuous – no random berms blocking them.
- Water has a clear path to the approved outlet.
- Driveway and patios don’t send water toward the house or the neighbour.
- Any catch basin or grate sits at the low point and isn’t buried.
10) Final thoughts: grading is boring until it’s expensive
Lot grading is one of those construction topics that feels unglamorous – until you’re dealing with water in a basement, ice on walkways, or a neighbour asking why your runoff now visits their backyard every time it rains. Done correctly, grading is simple, repeatable, and usually far cheaper than interior water repairs.
If you’re planning a new home, treat grading as a design item, not a landscaping item: build the grading plan into your process early, set elevations correctly, rough grade during construction, and finish with certification if required. That’s the clean, professional way to close a build.
Related guides
Lot grading and drainage in Ontario: frequently asked questions
Do I need a lot grading plan for a new home in Ontario?
In most cases, yes, in some form. While the exact requirement is set municipally rather than by a single province-wide rule, most Ontario municipalities require an approved lot grading plan as part of the building permit for a new home, especially in serviced areas, subdivisions, and infill. The plan shows proposed elevations, slopes, swales, high and low points, and where water is meant to go, and depending on the municipality and project it may need to be prepared or stamped by a qualified professional such as a professional engineer or an Ontario Land Surveyor. On top of the plan, many municipalities also require a final grading certificate after construction to confirm the lot was built as approved. Confirm the specific submission requirements with your local municipality before you finalize your foundation elevations, because grading and building height are tied together.
What is a lot grading certificate and when do I need it?
A lot grading certificate is the after-construction confirmation that the finished grading was actually built to match the approved grading plan. It is typically prepared by a qualified professional who surveys the completed elevations, confirms that water slopes away from the building and reaches the approved outlet, and certifies that the lot conforms to the design. Many Ontario municipalities require this certificate before they release your grading deposit or security and close out the file, so it is often the last box to tick on a new build. The sequence is design it, build it, prove it: the plan says what you will do, the construction does it, and the certificate proves it was done. If your municipality requires a certificate, budget for it and schedule it after final grading, not as an afterthought once you have already moved in.
How much is a grading deposit in Ontario?
It varies by municipality, project type, and whether you are in a subdivision or an infill situation, so there is no single number. Many municipalities collect a grading deposit or security as part of the building permit process, often in the range of a few thousand dollars per lot, and some deduct their review fees from that deposit. The deposit exists to make sure the final grading is actually completed as approved rather than left “mostly done” with a few low spots, and it is generally held until the grading is certified and the municipality is satisfied. The practical advice is to treat the deposit as a real line item in your budget, understand exactly what conditions release it, and plan the final grading and certification so you get it back promptly instead of leaving money tied up for a year.
Can I change the grading on my own lot?
Not freely. Your finished grading generally has to match the approved grading plan and the wider drainage concept, because changing it can push water onto a neighbour, create a new low spot at your own foundation, or break the outlet the whole street depends on. Filling in a swale because it looks odd, raising a patio, or adding hardscape without a drainage plan are common ways homeowners accidentally create flooding and end up regrading at their own cost. On top of the municipal side, if your lot is within a conservation-authority regulated area, altering grade or placing fill can require permission under Ontario Regulation 41/24. Before you reshape anything, check the approved plan, confirm whether you are in a regulated area, and if you are unsure, ask your municipality – a quick call is far cheaper than a regrade or a dispute with a neighbour.
When does a conservation authority get involved in grading?
A conservation authority gets involved when your lot is within a regulated area – typically near wetlands, watercourses, valley or stream corridors, shorelines, or hazardous lands. In those areas, grading, placing fill, or altering drainage can require permission from the authority. As of April 1, 2024, conservation-authority permissions across Ontario are administered under a single new regulation, Ontario Regulation 41/24, which replaced the old individual authority regulations and narrowed some of the triggers, including reducing the regulated area next to provincially significant wetlands. Because that clearance can count as Applicable Law for your building permit, a permit can stall until it is provided. The safe move is to contact your local conservation authority early, confirm whether your property is in the regulated area, and get written confirmation if no permit is required, so it does not surprise you mid-project.
What slope should the ground have around my foundation?
The governing principle is that finished grade must slope away from the building so water cannot pond against the foundation, and the general rule of thumb builders use is a fall of a few inches over the first several feet away from the wall – enough that a hose or a heavy rain visibly runs away from the house rather than toward it. The exact grades on your lot come from the approved grading plan, which balances the slope away from the building against the swales and outlets that carry the water off the property, so you should not simply pick a number. What matters most is that there are no low spots or reverse slopes near the foundation, downspouts, window wells, or below-grade entrances, since those are where the water that causes basement problems collects. When in doubt, follow the plan and confirm the finished elevations with whoever certifies your grading.
Where are my downspouts supposed to discharge?
Downspouts should discharge away from the foundation walls and toward the approved drainage path for your lot, not straight down beside the basement wall. Roof water is a surprisingly large volume in a storm, so a downspout emptying at the foundation can overwhelm the soil and the perimeter drainage and become a direct cause of a wet basement. The right destination depends on your lot: it may be a splash pad and a slope toward a swale, an extension that carries water well away from the wall, or in some serviced areas a connection defined by the municipality. Avoid dumping roof water onto a neighbour or into a spot that has no clear outlet. If you are unsure where your roof water is supposed to go, the approved grading plan or your municipality will tell you, and getting it right is one of the cheapest ways to protect the house.
Who should do my lot grading and site work?
Grading and drainage are site work, so the right people are an experienced excavation and site-work crew who understand how the grading plan, the foundation elevations, the swales, and the outlets fit together – not just someone with a machine who can push dirt around. On a new build, the grading should be coordinated with whoever set the foundation elevations, because the two have to agree, and it should be finished in a way that will actually pass the municipality’s grading certificate. Doing it right the first time is far cheaper than regrading after a wet spring or after a neighbour complains. In the Simcoe County and Georgian Bay area we handle the excavation, rough grade, drainage, and final grade with our own crew, so the site is set up to certify cleanly and keep the basement dry, and we are happy to price it from the lot.
Friendly disclaimer: this is practical education, not engineering or legal advice. Ontario requirements vary by municipality, subdivision agreement, site conditions, and whether regulated lands are involved. Always confirm the specific grading and drainage submission requirements with your local municipality and, if applicable, your local conservation authority.
Latest posts
Fresh guides, calculators & real-world advice
More from BuildersOntario – scroll to explore.
Loading latest posts…
Tip: shift + mousewheel works great