Ontario's Plain-English Guide to Custom Home Building📞 705-533-1633 | ☎️ 1-866-868-6606 | ✉️ info@icfhome.ca

How to Attach a Deck Ledger in Ontario (2026): No-Rot Guide
Builder Guide · Ledger & Attaching
How to Attach a Deck Ledger in Ontario (2026): No-Rot Guide
Knowing how to attach a deck ledger is the single most important skill in deck building — get it wrong and the house rots or the deck pulls away. Here’s every ledger and attachment question answered: bolting, flashing, brick, lateral ties, and when to go freestanding instead.
If your deck attaches to the house, the ledger is where safety is won or lost. A properly bolted, flashed ledger lasts decades; a nailed or un-flashed one rots the house framing or tears off under a crowd. Below we answer the eight attachment questions homeowners ask most. This page is part of our complete guide to building a deck in Ontario.
Attaching the ledger so the house doesn’t rot
How do I attach the ledger so the house doesn’t rot behind it?
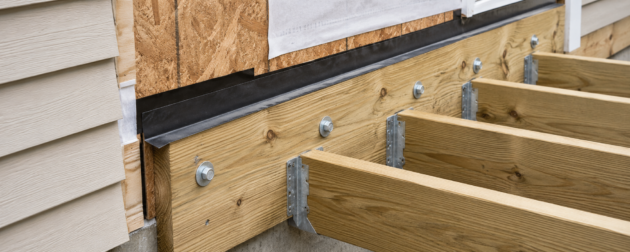
Bolt the ledger to the house’s rim joist through the sheathing — never to siding or brick veneer — and flash it so water can’t sit behind it. Lay a peel-and-stick membrane on the sheathing first, fasten with hot-dip galvanized or approved structural hardware, then cap the top with metal flashing tucked under the housewrap.
The enemy is trapped water. In Ontario’s freeze-thaw climate, moisture behind an un-flashed ledger soaks the rim joist, freezes, and rots the connection from the inside out — often invisibly for years. Bolting into solid framing handles the load; flashing handles the water. You need both. The same logic carries up into the deck framing that the ledger feeds.
What’s the correct flashing detail and layer order?
Water has to shed outward at every layer. The sequence matters: housewrap on the sheathing, a self-adhered membrane where the ledger lands, the ledger bolted tight, then Z-flashing over the ledger’s top edge tucked behind the housewrap and siding above. Caulk is not flashing — it fails in a few seasons.
- Sheathing + housewrap: the wall’s existing weather barrier, lapped so upper layers cover lower ones.
- Self-adhered membrane: a peel-and-stick strip on the sheathing where the ledger sits, so any bolt penetrations are sealed.
- The ledger: bolted tight to the rim joist, often on small spacers/washers so water can drain behind it.
- Z-flashing (cap flashing): metal over the top edge of the ledger, slid up under the housewrap/siding so water runs out over the ledger, never behind it.
Two ways to handle the permit (we’ll do the heavy part)
DIY with an instant PDF, or hand us the drawings. Either way, you skip the guesswork.
Best value
$1,500 designer value
The Ontario Deck Bible
Your deck permit, filed by Sunday.
No specialist, no waiting room — just follow the steps.
$1,500$29.99 one-timeSave $1,470
Everything a designer does — for the price of a coffee run.
- File your own permit in a weekend — no specialist
- The ledger, flashing & fastener details done right
- Whether it’s your first deck or your fiftieth — you need this
- One coffee-run price vs a $1,500 designer
30-day money-back guarantee
Get instant access — $29.99 →
Secure checkout · download in 2 minutes · yours forever
Done-for-you
Permit-Ready Deck Plans
Still need to sort the permit? We’ll do the paperwork.
Skip the building-department runaround. Grab the DIY report, or let us draw the plans.
$399 flat, up to 500 sq ftFraction of a designer
+ $0.75/sq ft over 500 sq ft
- The full set your city wants: site plan, framing, elevation, section, details
- Ledger, flashing & lateral-tie details drawn to code
- We handle the heavy part — you just submit and build
- Drawn by a BCIN-registered designer with 15 years’ experience
Free quote · no obligation
Get my free plans quote →
Most decks: a fixed price back within 1 business day
Fasteners, brick and freestanding
Lag bolts vs through-bolts vs structural screws — what spacing?
Through-bolts are strongest; approved structural screws are code-accepted and easiest to install; plain lag screws are the minimum and must fully bite the rim joist. Stagger two rows and space fasteners roughly every 16 inches, kept back from the board ends and edges. Use only hot-dip galvanized or stainless hardware against treated lumber.
Whatever you choose, the fastener has to land in solid structural framing — the rim joist or blocking — not just the sheathing. Match every connector, washer, and bolt to treated-lumber-rated metal, because standard zinc corrodes fast against modern pressure-treated wood and can fail at the connection.
Can I attach a ledger to brick or brick veneer?
No. Brick veneer is a cladding, not structure, and won’t hold a deck. You either remove the veneer and bolt through to the framing with a proper standoff detail, or you skip attaching entirely and build a freestanding deck. Bolting a ledger to brick veneer is one of the most common causes of deck collapses.
The brick you see on most Ontario homes is a single decorative wythe tied loosely to the framing behind it — it can’t carry the pull-out and downward loads a deck puts on a ledger. Solid masonry walls are different and may allow a designed connection, but for typical veneer, freestanding is the safe, simple answer.
Attached vs freestanding — which is safer?
Both are safe when built right, but freestanding removes the riskiest detail — the ledger — entirely. If your wall is brick, the framing is questionable, or you can’t flash it properly, go freestanding: it adds one beam-and-post line but eliminates the rot-and-pull-away failure mode. Attached decks save space but demand a flawless ledger.
First 2 questions free
Not sure your ledger detail will pass inspection?
The framing inspection checks the ledger, its fasteners, flashing, and any lateral ties. Ask the OBC Code Navigator any Ontario deck question and get the exact Code Article to show your inspector.
Is your ledger up to code? Find out free →Lateral loads, tricky walls and old ledgers
Do I need lateral-load (hold-down) connectors?
Often yes. Many Ontario municipalities now require lateral-load (hold-down) connectors that tie the deck joists back into the house’s floor framing, because ledger bolts alone resist pull-away poorly. They’re inexpensive tension ties installed in pairs. Confirm your town’s requirement — and remember that going freestanding avoids this detail altogether.
Can I attach to a cantilevered floor or bump-out?
Generally no. A cantilevered floor or bump-out isn’t designed to carry a deck’s pull-out and downward loads, so you can’t safely hang a ledger off it. Build that side freestanding with its own beam and posts, or have an engineer design a connection. Don’t bolt a ledger to an overhang and hope.
My old deck’s ledger is just nailed on — is it dangerous?
Yes — a nailed-on ledger is a known collapse risk and should be fixed now. Nails pull straight out under load, and most deck collapses start at the ledger. Add proper bolts or structural screws into the rim joist, check for hidden rot behind it, and add flashing. If you can’t confirm solid framing behind it, convert the deck to freestanding.
Inspect before the season’s first party. Push and pull at the ledger, look for rust streaks, soft wood, or a gap opening at the house. A ledger that’s only nailed, or set on rotten framing, can let go without warning when the deck is full of people.
Build from the ground up: the ledger only works if the rest of the frame does. Size your posts and beams in the framing guide, set the footings under them with the deck footings guide, and keep it solid long-term with our deck maintenance guide. The guard that sits on the frame is covered in the deck railing height guide.
Frequently asked questions
How do I attach a deck ledger so the house doesn’t rot?
Bolt the ledger to the house’s rim joist through the sheathing – never to siding or brick veneer – and flash it. Lay a peel-and-stick membrane on the sheathing, fasten with hot-dip galvanized or structural hardware, then cap the top with metal flashing tucked under the housewrap so water sheds out, not behind it.
What’s the correct ledger flashing order?
From the wall out: housewrap on the sheathing, a self-adhered membrane where the ledger lands, the ledger bolted tight, then Z-flashing over the ledger’s top edge tucked behind the housewrap and siding above. Each layer laps over the one below so water always runs outward. Caulk is not flashing.
Lag bolts, through-bolts or structural screws – and what spacing?
Through-bolts are strongest, approved structural screws are code-accepted and easiest, and plain lags are the minimum. Stagger two rows about every 16 inches, kept back from board ends and edges, all landing in the rim joist. Use only hot-dip galvanized or stainless hardware against treated lumber.
Can I attach a deck ledger to brick veneer?
No. Brick veneer is cladding, not structure, and won’t hold a deck. Either remove the veneer and bolt through to the framing with a standoff detail, or build the deck freestanding. Bolting a ledger to veneer is one of the most common causes of deck collapses.
Is an attached or freestanding deck safer?
Both are safe when built right, but freestanding removes the riskiest detail – the ledger – entirely. If the wall is brick, the framing is questionable, or you can’t flash it properly, go freestanding. It adds one beam-and-post line but eliminates the rot-and-pull-away failure mode.
Do I need lateral-load (hold-down) connectors on my deck?
Often yes. Many Ontario municipalities now require lateral-load connectors that tie the deck joists back into the house floor framing, because ledger bolts alone resist pull-away poorly. They’re inexpensive tension ties installed in pairs. Confirm your town’s requirement – and freestanding avoids the detail entirely.
Can I attach a deck to a cantilevered floor or bump-out?
Generally no. A cantilevered floor or bump-out isn’t designed to carry a deck’s loads, so you can’t safely hang a ledger off it. Build that side freestanding with its own beam and posts, or have an engineer design the connection. Don’t bolt a ledger to an overhang.
My old deck’s ledger is just nailed on – is it dangerous?
Yes. A nailed-on ledger is a known collapse risk – nails pull straight out under load, and most deck collapses start at the ledger. Add bolts or structural screws into the rim joist, check for hidden rot, and add flashing. If you can’t confirm solid framing behind it, convert to freestanding.
Disclaimer: General guidance based on the 2024 Ontario Building Code and common Ontario municipal practice; ledger, flashing, fastener, and lateral-load requirements vary by municipality and by wall type. Always confirm against your local building department and stamped drawings. This is not engineering advice.
Related reading
More deck guides, calculators & advice
More from BuildersOntario — scroll to explore.
Loading latest posts…
Tip: shift + mousewheel works great
