Ontario's Plain-English Guide to Custom Home Building📞 705-533-1633 | ☎️ 1-866-868-6606 | ✉️ info@icfhome.ca

Stairs and Stringer Calculator
← Building a Deck in Ontario / Stairs & stringers
Layout + cut summary
Ontario / OBC reminder notes
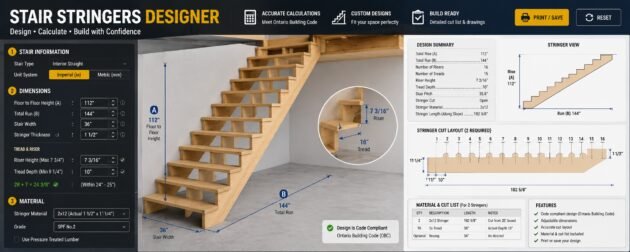
Plan your stair stringers – exact risers, run, length, and a cut layout
Enter your finished-to-finished rise and your preferred riser/run. This calculator outputs riser count, exact riser height, number of treads, total run, stringer length, stair angle, estimated stringer count, plus a simple cut-layout summary – and it now checks your rise and run against the current Ontario Building Code limits as you type (builder-friendly, not a permit drawing).
How to measure (so your first step isn’t weird)
Measure finished floor to finished floor – not subfloor to subfloor. Flooring thickness changes the rise, and stairs are where small “close enough” mistakes become big trip hazards.
Tip: if you’re renovating, verify both floors are truly “finished height” before you lock anything in.
What this calculator assumes
Straight flight. Layout uses run (nosing-to-nosing). Nosing is shown as a reference. Stringer count is estimated from width/spacing (with override).
Building deck stairs? Pair this with the deck calculator and the railing & guard code.
Calculator
Live OBC rise/run check
Inputs
Builder mode
Units
–
Pick what’s easiest. Internally the math runs in mm.
Total rise (finished floor to finished floor)
in
Example: enter 108 in for a typical floor-to-floor stair.
Lock number of risers (instead of target riser height)
Turn ON if you already know the riser count you want.
Target riser height
in
We’ll choose a whole number of risers that makes this close.
Run (nosing-to-nosing)
in
More run = less “ladder feel.” Your knees will approve.
Nosing projection (optional)
in
Reference only. Layout uses run.
Top landing (no top tread)
–
Typical: treads = risers – 1.
Stair width
in
Used to estimate stringer count.
Max stringer spacing (on-center)
in
Tile/stone/composite treads often want tighter spacing.
Stringer stock length
2×12
We’ll flag if your stock is too short.
Show quick material costs (optional)
Editable pricing. Same idea as your other calculators.
Quick sanity checks
Builder mode
Not a permit drawing – just the common “oops” points.
Measure finished-to-finished
Yes. Flooring changes your rise.
Uniform risers
One odd step = trip call.
Headroom check
Bulkheads & ducts love stairs.
Door swing at top
Don’t swing into the stair.
Results
Summary + layout
Risers
–
–
Treads
–
–
Stringer length
–
–
Stringer count (est.)
–
–
| Layout | Value |
|---|
Quick Cut Summary
Planning only
| Item | Result |
|---|
Mini takeoff (planning only)
Builder mode
Because you’re going to the lumberyard anyway.
Estimated 2×12 stringers
–
Treads
–
Risers
–
Total run (finish check)
–
Before you cut anything… Real-world
- Confirm stock length: if “too short” shows, don’t “make it work.” Redesign or buy longer.
- Check finished tread thickness: your first/last step feel changes with finish thickness.
- Stringer spacing: if you’re using tile/stone treads, tighten spacing (or add a center).
Building deck stairs? Confirm guard & handrail rules on the railing code page.
NOTES (Ontario / OBC)
Inspector-proofing
This is your “don’t-get-a-call-from-the-inspector” checklist. The numbers below are the current Ontario Building Code Part 9 stair limits (2026 changes in effect). Always confirm the current OBC and your local inspection expectations – this is a planning aid, not a permit drawing.
| Dimension | Private stair (in a house / dwelling unit) | Public / common stair |
|---|---|---|
| Riser height | 125 mm min – 200 mm max (about 4.9-7.9 in) | 125 mm min – 180 mm max |
| Run (nosing-to-nosing) | 255 mm min (10 in) – 355 mm max | 280 mm min |
| Tread depth | 235 mm min – 355 mm max | 280 mm min |
| Stair width | 860 mm min (clear) | 900 mm+ (use varies) |
| Headroom | 1950 mm min | 2050 mm min |
| Handrail height | 865 mm min – 1070 mm max (max raised from 965 mm in 2022) | |
Big 2022 change: the minimum run for private stairs increased from 210 mm to 255 mm (10 in) – that is why older houses feel steeper than new ones.
Headroom (bulkheads love stairs) 9.8.2.2
Headroom is measured above the nosing line across the required stair width.
- Dwelling unit: minimum 1950 mm
- Other stairs: minimum 2050 mm
Bulkheads, duct drops, and beams are stair headroom’s natural predator. Check early – not after drywall.
Stair width (inside a dwelling) 9.8.2.1
Within a dwelling unit, at least one stair between each floor level must meet the minimum width (860 mm clear).
- Measure clear width between finished surfaces/guards – not studs.
- “Private stair” doesn’t mean “anything goes.”
Runs got bigger in 2022 (falls are expensive) 9.8.4.1
Effective January 2022, the minimum run for private stairs went from 210 mm to 255 mm (10 in).
- More run = more foot on the tread = fewer falls.
- If you’re tight for space, avoid pushing run to the bare minimum – the calculator flags anything under 255 mm.
Rise, tread depth, and winder rules didn’t change – only the minimum run increased.
Landings (don’t pinch them) 9.8.6
Landings are where people turn, stop, and open doors – so they need to feel safe and usable.
- Straight or turned landing length is the lesser of the stair width or 1100 mm (2022 change).
- A door swinging over a stair with no real landing is a classic fail.
Most stair redesign pain is landing + door swing + headroom – not the stringer math.
Handrails & guards (where pretty often fails) 9.8.7 / 9.8.8
- Handrail height is 865 mm min to 1070 mm max (the max went up from 965 mm in 2022).
- Handrails need to be graspable and generally continuous along the flight (with limited exceptions).
- Guards are about fall protection – height, strength, and openings matter.
Build the rail like it’s meant to catch a falling adult. Because it is.
Uniform risers (the #1 trip trigger) 9.8.4
- Risers should be uniform within a flight – one odd riser is where people trip.
- Do your rise from finished floor to finished floor (include finishes).
Changing flooring thickness after framing is the fastest way to “fail by surprise.”
Rise/run comfort check (don’t build a ladder) 9.8.4
- Even when “legal,” steep stairs feel unsafe (especially with kids, boots, or carrying items).
- If you have space, favour more run instead of pushing rise.
If it feels like a ladder in framing, it’ll feel worse in socks at 2am.
Spiral stairs are now permitted (limited) 9.8.4.5A
The 2022 code newly permits spiral stairs as the single means of egress for no more than 3 persons, with:
- Handrails both sides, outer handrail 1070 mm high; clear width 660 mm.
- Risers no more than 240 mm; treads min 190 mm at 300 mm from the inside handrail; clear height 1980 mm.
Great for tight spaces – but confirm the egress/occupant-count limits before you commit.
Guard openings (sphere rules that kill fancy railings) 9.8.8
- Openings in guards are limited to reduce child fall-through/entrapment risks (100 mm sphere for most residential guards).
- Triangular stair openings get special attention.
If the design relies on “it’s close enough,” it usually isn’t.
Rather have the stairs (and the deck) built right the first time?
Stairs are where a deck or a reno passes or fails inspection – rise, run, headroom, landings, guards, and handrail continuity all have to line up. We build decks, stairs, and additions across Simcoe County and the Georgian Bay area, and we can price your job from the framing up. No charge to ask.
Pulling the permit yourself? Two books that pay for themselves
Stairs, decks, and additions are permit jobs. The Permit Bible gets the file right; the Lot Bible budgets the whole build. Each $29.99, or both for $49.99.
Most relevant here
The Ontario Building Permit Bible
Drawings, fees, inspections – handled.
$10,000$29.99one-time
Everything a builder does to run a permit and pass inspections – the order of operations, the complete-application checklist, real 2026 fees, and how to never fail an inspection. Stairs, decks, and framing included.
- The complete-application checklist, so the file doesn’t bounce
- What drawings a deck/stair permit actually needs
- Real 2026 permit fees and what triggers them
- How to never fail an inspection – and the costliest mistakes
30-day money-back guarantee.
Get the Permit Bible – $29.99 →
Secure checkout – download in 2 minutes – yours forever
Land + budget
The Ontario Lot-Buying Bible
If the deck comes with a whole build.
$200+ of pro advice$29.99one-time
The 28-page step-by-step that budgets a build the way the money actually flows – land, site, hard and soft costs, financing, and a real contingency.
- The hard-cost / soft-cost / contingency budgeting worksheet
- Site-work, well, and septic cost planners
- The 10-minute go/no-go test and printable scorecard
- Bonus chapters: DIY trades, wells, easements, negotiation
30-day money-back guarantee.
Get the Lot Bible – $29.99 →
Secure checkout – download in 2 minutes – yours forever
Building the whole thing? Get both Bibles.
Budget the land and the build, then run every permit – deck and stairs included – without the guesswork.
$59.98 Both for $49.99
Get both Bibles →
Next steps in your deck plan
Deck material & cost calculator →
Railing & guard code →
Framing & spans →
Back to the full deck guide →
Information only – not a permit drawing. Always confirm current OBC requirements and local inspection expectations.
Latest posts
Fresh guides, calculators & real-world advice
More from BuildersOntario – scroll to explore.
Loading latest posts…
Tip: shift + mousewheel works great
Stair Construction FAQ (Ontario-Friendly Answers)
These are the questions homeowners and contractors ask the most when laying out and cutting stair stringers. This is practical guidance (plus the “don’t get burned by inspections” stuff). Always confirm final requirements with your local building official and the Ontario Building Code for your exact situation.
Measure total rise (finished floor to finished floor). Divide by a target riser height (most comfortable is usually around 7"–7 3/4" for typical residential stairs). Round to a whole number of risers, then re-calc: riser height = total rise ÷ number of risers.
Pro tip: Your bottom and top steps are where mistakes hide—measure from finished surfaces, not subfloor.
The easiest way to remember: you have one more riser than treads in a straight run when the top floor acts as the final “tread.” Example: 13 risers usually means 12 treads.
Where people mess up: adding a “tread” at the top when the upper floor already is the tread.
Total run is basically tread depth × number of treads (for straight stairs). Stairs don’t fit when the opening (or landing space) doesn’t account for: nosing projection, drywall thickness, stringer thickness, and headroom clearance.
Bulkheads love stairs. They move in quietly… then steal your headroom.
Comfort usually lands around a mid-30° pitch for typical residential stairs. Too steep and it feels like a ladder; too shallow and it eats floor space fast. Consistency is king: equal risers and predictable tread depth matter more than chasing a magic angle.
The nosing is the front overhang of the tread past the riser face. It changes how the stair feels underfoot and can change how you measure “effective” tread depth. When laying out stringers, be clear whether your tread depth input is: (A) from riser-to-riser, or (B) including nosing.
If your calculator assumes one method and your carpenter cuts the other… congratulations, you’ve built a trip hazard.
Always measure from finished floor to finished floor (tile, hardwood, underlay—everything). If finishes aren’t installed yet, you must add the finish thicknesses into the rise. This is the number one reason the bottom step ends up “weird.”
Headroom is measured vertically from the nosing line (or stair line) to the ceiling/obstruction above. The trick is to check it where the stair passes under bulkheads and under floor framing. A stair can be perfect on paper and still lose headroom after drywall, beams, or ductwork show up.
Do the headroom check early—before mechanical runs. Once ducts move in, they don’t like moving out.
The OBC has minimums, but in real life you want enough width for moving furniture and not shoulder-checking the wall. Also remember: handrails can reduce the “clear” width. Aim wider than the bare minimum if you have the space—stairs are used every day, forever.
Landings are required at the top and bottom, and often when you change direction. Size depends on the stair width and swing of doors nearby. The most common mistake is “pinching” the landing with a door swing or a tight hallway.
Don’t design a landing that only works when you walk sideways carrying groceries like a crab.
Open risers can be allowed, but there are limits meant to prevent small kids from slipping through. If you’re doing open risers, plan early—stringer layout, tread thickness, and finish details all change.
Winders are triangular treads used to turn a stair without a landing. They’re space-savers, but they’re easy to build wrong and easy to trip on if the walking line isn’t respected. If you need winders, lay them out carefully and check code requirements for the narrow end and walking line.
Stringer spacing depends on tread thickness, material, and how the treads are supported. Too wide and you’ll get squeaks, flex, and cracked finishes. Too tight and you’re wasting lumber and time. For finished stairs, build stiffer than you think you need—nobody complains about solid stairs.
Bouncy stairs feel cheap even in a luxury house. Stiff is the new fancy.
A cut stringer is notched like a saw blade and the treads sit on the notches. A housed stringer has pockets/dados routed for treads and risers, often giving a cleaner finish. Housed can look more “finished,” but it requires more precision and shop time.
Squeaks come from movement and rubbing: tread-to-stringer, riser-to-tread, fasteners, and seasonal shrink/swell. Use construction adhesive where appropriate, screw rather than nail in key spots, and keep everything tight and supported. If you’re finishing in hardwood, plan the fastening method so you’re not creating future rub points.
Usually it’s one of these: wrong height, missing returns at the ends, poor graspability, or guards that aren’t strong enough (or have openings that are too large). Plan handrail blocking early—after drywall is too late for wishes.
Handrails aren’t décor. They’re “save-your-teeth” equipment.
Requirements depend on stair width, configuration, and whether walls/guards exist on both sides. Many homeowners choose a handrail wherever a person might naturally reach for support—especially in basements and high-traffic stairs. When in doubt, build for safety and comfort, not just minimum compliance.
If your stair starts on concrete or tile, confirm finished height early. The bottom riser often needs adjustment if you’re adding tile/thinset, sleepers, or underlayment later. The goal is still the same: all risers equal.
Use a framing square (or a stair gauge setup) and mark one “master” stringer carefully. Dry-fit it. Check rise/run, landing alignment, and headroom, then use it as the template for the rest. Small layout errors multiply fast when you cut three or four stringers from the same wrong template.
Measure twice, cut once… then dry-fit, then measure again. Wood is honest. It shows your mistakes immediately.
Basement stairs get lots of traffic (laundry, storage, kids, boots), so durability and grip matter. Exterior stairs add weather exposure and slip risk—material choice, drainage, and consistent risers become even more critical. Also watch door swings and landing sizes so you’re not stepping backward into thin air.
1) Measuring rise from subfloor instead of finished floor.
2) Bottom riser “different” because flooring thickness wasn’t planned.
3) Headroom lost to bulkheads, beams, or ducts (after the stair is framed).
4) Landings pinched by door swings or tight hallways.
5) Handrails/guards treated like décor instead of safety hardware.
Builder note: If you want, I can tailor these FAQs to match your exact stair calculator inputs
(rise/run/nosing/landing checks) and weave in specific OBC clause references the same way you’ve been doing in your “NOTES (ONTARIO / OBC)” column.
