Ontario's Plain-English Guide to Custom Home Building📞 705-533-1633 | ☎️ 1-866-868-6606 | ✉️ info@icfhome.ca
Hydronic Radiant Floor Heating Cost in Ontario (2026): Installed Prices, Monthly Bills, and the Best System Choices
2026 Ontario cost guide
Real installed numbers
What’s actually in the price
Part of: Radiant & In-Floor Heating in Ontario – Radiant floor heating 101
Hydronic Radiant Floor Heating Cost in Ontario (2026)
Tired of getting five quotes that are all over the map? You’re not crazy – radiant pricing genuinely varies, and most of the spread comes down to things nobody itemizes. Here are real 2026 Ontario installed ranges, exactly what drives the bill, the two radiant-only extras people never see coming, and how to budget so you don’t overpay. Written from 30+ years of designing and installing radiant in our own homes.
$6-$12/sf
Tubing + install (slab)
$20k-$45k+
Full hydronic system (whole home)
+50-80%
Retrofit vs new build
$3-$5/sf
1.5 in concrete topping

Why nobody can give you a straight price
It’s not that installers are hiding the ball – it’s that “radiant floor heating” can mean ten different systems. The first question is what’s heating the water: a condensing boiler, an on-demand combi, a heat pump, solar, propane, oil? Each changes the number. The second is two line items unique to radiant that most quotes bury – we break both out below so you can compare apples to apples.
2026 Ontario installed ranges
People compare apples to space shuttles: one quote is just tubing in a slab; the next includes a boiler, indirect tank, three manifolds, smart thermostats, and a mechanical room full of pumps and valves. Here’s the honest spread.
| Scope | Typical 2026 range (Ontario) | What’s usually included |
|---|---|---|
| Tubing + install (new-build slab / basement) | $6 – $12 / sq ft | PEX, fastening method, basic manifold, rough-in labour |
| Full hydronic system (new build, whole home) | $20,000 – $45,000+ | Tubing + manifolds + controls + boiler or heat pump + commissioning |
| Retrofit into a finished home | +50 – 80% vs new | Demolition, floor build-up, added labour, re-finishing |
Final pricing depends on heat source, floor build-up, controls/zoning, and how low the design water temperature can run (better envelope = lower temps = smaller, cheaper equipment).
The two extras nobody itemizes (and why the equipment itself isn’t the story):
Done right, the radiant equipment and labour cost about the same as other heating systems. What makes a radiant quote look higher is two things unique to it:
1. Under-slab insulation. The Ontario Building Code does NOT require insulation under a basement slab if you heat with a furnace – so on a radiant quote it shows up as an “extra.” But on a forever home, why on earth wouldn’t you insulate under the slab anyway? Skip it and you’re heating the earth.
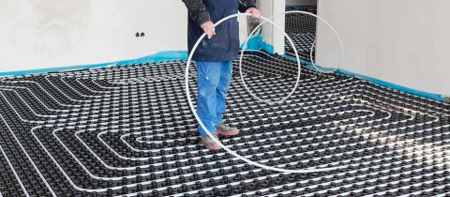
2. A 1.5 in concrete topping over each floor structure to embed the PEX – roughly $3 to $5 per sq ft depending on local concrete and finisher rates. And that topping isn’t just a cost – it’s one of the best features of the whole system: it stiffens the house (the glasses in your china cabinet stop rattling), works as a thermal-mass heat sink so the heat source cycles far less often, soundproofs between floors, and gives dead-even floor temperatures with no hot or cold spots.
What actually drives the cost
1. The heat source
A condensing boiler is still the most common heat source for hydronic floors in Ontario – predictable, loves low water temperatures, handles the coldest days. Air-to-water heat pumps are rising fast in efficient homes designed for low-temp water. Our own go-to on about 90% of jobs is a combination on-demand (combi) water heater with two loops – one for potable hot water, one for the radiant – so you also never run out of shower hot water. If you have gas or propane and add solar, that’s about the cheapest heat you can run. We compare every option on the hydronic heating page.
2. Floor assembly (slab, basement, staple-up, overpour)
Slabs and basement floors are the most cost-effective – you’re already pouring concrete. Staple-up under wood floors works but wants heat-transfer plates and careful design. Overpour/thin-slab retrofits add height, transitions, and labour – and headaches are always priced per square foot. The methods and build-ups are laid out on in-floor systems & methods.
3. Zoning and controls
Every zone adds parts: manifold ports, actuators, thermostats, balancing, commissioning time. Zoning is great until someone designs 12 zones for an 1,800 sq ft bungalow. Radiant is naturally even, so a good layout usually needs fewer zones than you’d think.
4. Mechanical-room extras nobody budgets
Pumps, expansion tank, air separator, mixing valve, fill/backflow preventer, glycol (for garages), indirect tank, venting, drains, electrical. Not optional if you want it quiet, stable, and serviceable for 30 years. The mechanical room is where budgets get surprised.
New build vs retrofit: the gap is real
New construction is where radiant shines financially – the layout is designed from day one, tubing goes in before finishes, and the mechanical is planned as part of the whole-home system. Retrofits are worth it mainly when the project already includes major flooring work (a gut reno, a basement finish, replacing floors). Tearing up finished hardwood just to chase warm toes is where wallets develop opinions. If you’ve got the headroom, a 1.5 in overpour on an existing floor can work – door heights are the constraint.
Operating cost in Ontario
Hydronic radiant runs at lower water temperatures than baseboard, which improves condensing-boiler efficiency and boosts heat-pump performance. Your real bill depends on your home’s heat loss, fuel, and how you zone. Natural gas + condensing boiler is the predictable common choice; an air-to-water heat pump can be very economical in an efficient home; electric/propane/oil swing the most – which is exactly why the heat-loss math earns its keep before you buy equipment. For the furnace comparison, see radiant heat vs forced air.
Price performance before you price equipment.
Get the heat-loss + radiant design that right-sizes the whole job
The single biggest way to avoid overpaying is to start with a CSA F280-12 heat-loss calculation – it right-sizes the boiler or heat pump, prevents oversizing and short-cycling, and is exactly the BCIN-stamped paperwork your Ontario permit requires (the radiant loop layout can’t be designed until that number exists). Upload your plan and our engineer emails you a price. More: do I need a heat-loss calculation?
Is hydronic radiant worth it in 2026?
If comfort matters and you’re building new or doing a major reno, yes – it’s one of the most satisfying upgrades you can make, and after 30+ years we’ve had repeat client after repeat client: once people live with radiant, they don’t go back to a furnace. If your single priority is the lowest possible upfront price, a basic forced-air system wins that narrow fight. Most people who choose radiant aren’t chasing “cheapest” – they’re chasing the best daily living experience for the money.
- Usually worth it: new build (slab/basement/garage), efficient envelope, you value even quiet comfort, you want to pair with high-efficiency heat sources.
- Maybe not: you need the lowest upfront cost, you want fast temperature swings, or you’d retrofit without doing flooring work anyway.
Get a radiant in-floor heating quote
We’ve designed and installed radiant in our own ICF homes for 30+ years. Tell us about your project and we’ll call you back – usually within one business day – with a real plan and price. No cost, no obligation.
OK
You’re on the list!
Thanks – we’ll call you within one business day to talk through your radiant project and pricing.
Want a one-on-one radiant consult?
A second opinion on a quote, system design, or heat-source choice. We scope it on a quick call and send a secure payment link – you only pay once you know what you’re getting.
Building new? The HST rebate can cover a big slice
If this radiant system is going into a new build, that home likely qualifies for Ontario’s enhanced HST rebate – up to $130,000 back if your build contract is signed before the deadline. Worth checking before you commit.
Ontario HST Rebate | Deadline April 1, 2027
You Could Lose Up To $106,000 If You Don’t Start Before April 2027
Ontario’s enhanced HST rebate puts up to $130,000 back in a new-home builder’s pocket – but only if your build contract is signed before April 1, 2027. Miss that window and you fall back to the standard $24,000 rebate.
$0
Contract signed before Apr 1, 2027
$24,000
Signed after the deadline
$900,000
Miss the deadline and you forfeit
$0
Estimate based on Ontario’s 2026 enhanced HST rebate (Bill 114). Final eligibility is confirmed by a licensed rebate specialist – that’s what the free check is for. Full HST rebate details
Radiant pairs best with ICF
An ICF home loses less heat, so the radiant system runs at lower water temperatures - which means smaller, cheaper equipment, lower bills, and quieter operation. See what ICF is, browse our ICF house plans (every one offered with the ICF + radiant package), run the ICF cost calculator, or check code with the OBC Code Navigator.
NEW: What goes on top of the heated slab, and what it costs
This page prices the heating system. The floor covering over it is priced separately now, so nothing gets counted twice: tile, engineered hardwood, vinyl, and which of them the slab likes best.
Best flooring for radiant heat · Flooring over a heated ICF slab · Flooring cost calculator
More radiant guides
Radiant & in-floor hub
Electric vs hydronic
Radiant vs forced air
Radiant floor heating 101
In-floor systems & methods
Hydronic heating
Solar radiant heating
Solar thermal vs PV
Radiant + flooring
Will radiant heat my house?
Do I need a heat-loss calc?
Heated garage & shop floors
Radiant floor cooling
Heat-loss calculator
Radiant floor heating cost in Ontario: FAQs
How much does radiant floor heating cost per square foot in Ontario?
As 2026 planning numbers, tubing plus install in a new-build slab or basement runs about $6 to $12 per sq ft of heated area. A full whole-home hydronic system - tubing, manifolds, controls, the boiler or heat pump, and commissioning - typically lands between $20,000 and $45,000+. Electric mats for a small area run higher per sq ft but lower per project. The big swing factors are the heat source, floor build-up, zoning, and how low the water temperature can run.
What does it cost to put in-floor heating in a whole house (1,500-2,000 sq ft)?
For a new-build hydronic system covering a 1,500 to 2,000 sq ft home, plan on roughly $20,000 to $45,000+ all-in, depending on heat source, number of zones, and floor assemblies. The tubing itself is cheap; the cost is the manifolds, controls, mechanical room, and heat source. A proper heat-loss calculation keeps you from oversizing the equipment and overspending.
How much does hydronic radiant cost vs electric?
Electric mats are cheaper to install in a small area (a bathroom can be a few hundred to about $1,200) and need no mechanical room - but they're expensive to run as primary heat over large areas. Hydronic costs more up front for whole-home coverage but is far cheaper to operate at scale, especially with a condensing boiler or heat pump. Rule of thumb: electric for targeted comfort zones, hydronic for whole areas and primary heat. See the full breakdown on electric vs hydronic floor heating.
What does radiant floor heating cost to run per month?
It depends on your home's heat loss, fuel, and zoning more than on the radiant itself. Hydronic runs at low water temperatures, which makes a condensing boiler or heat pump efficient, so a well-insulated home is cheaper to heat than the same home on forced air. The honest answer: do a heat-loss calculation and you'll get a real monthly number for your house instead of a guess.
Is in-floor heating expensive to operate compared to a furnace?
Not in a well-built home - it's often cheaper. Radiant warms surfaces and people directly, so many homeowners stay comfortable at a slightly lower air temperature, and the low water temps suit high-efficiency equipment. Where it gets expensive is electric resistance radiant run as primary heat over a large area, or any system in a leaky, under-insulated house. The full comparison is on radiant heat vs forced air.
How much does it cost to heat a 40x60 shop with in-floor heat?
A 2,400 sq ft shop slab is a great radiant candidate. Budget for the tubing and install plus proper under-slab insulation, a glycol fill (garages and shops need antifreeze), and a heat source sized to the building's heat loss and how warm you keep it. Shops are usually kept cooler than a house, which helps. We'll give you a real number on a quick call - it's one of the most satisfying places to put radiant. Full detail on the heated garage & shop floor cost page.
What's included in a radiant quote - and what's usually left out?
A good quote lists the heated area, zoning, floor type, supply temperatures, and exactly what's included: tubing, manifolds, controls/thermostats, the mechanical room components, the heat source, and commissioning. The things "cheap" quotes quietly leave out are the mechanical-room extras, commissioning, the heat source, and the two radiant-specific items - under-slab insulation and the 1.5 in concrete topping. Always compare on the same scope.
How much does the boiler add to the total cost?
The heat source is one of the biggest single line items and varies widely: a condensing boiler with an indirect tank, an on-demand combi, or an air-to-water heat pump are all different prices. Our usual on most jobs is a combi on-demand unit running two loops - one potable, one radiant - which keeps the mechanical room simpler and means you never run out of shower hot water. The right choice falls out of your heat-loss number. More on the hydronic heating page.
Why are the price ranges I'm getting so different?
Because the quotes aren't for the same thing. One is tubing-only in a slab; the next is a full system with boiler, tank, three manifolds, smart thermostats, and commissioning. On top of that, radiant carries two extras other systems don't - under-slab insulation (not required by code with a furnace) and the 1.5 in concrete topping at $3 to $5 per sq ft. Get every quote on the same scope and the spread shrinks fast.
Does radiant floor heating qualify for any rebates or the HST new-home rebate?
Heat sources and efficiency upgrades - heat pumps, insulation - are the usual targets of energy rebate programs, and those rules change often, so confirm current eligibility before you sign. Separately, if the radiant is going into a new home, that home generally qualifies for Ontario's enhanced HST new-home rebate of up to $130,000 if contracted before the deadline. Use the HST check on this page to see your number.
NEW: The heat source your radiant floor wants
Condensing boiler, combi, air-to-water or geothermal by install and running cost, what a complete combi mechanical room costs, and what to check when a zone stays cold.
Best heat source for radiant · Air-to-water heat pumps · Combi boiler cost · Radiant floor problems
More on heating and efficiency
Reviewed and updated October 2026. Costs on this site are Ontario ranges, not quotes; code references are to the Ontario Building Code in force at the date above.
Latest posts
Fresh guides, calculators & real-world advice
More from BuildersOntario - scroll to explore.
Loading latest posts...
Tip: shift + mousewheel works great
Before you price it — size it.
Hydronic system cost starts with the load: a room-by-room CSA F280 calculation determines tubing layout, water temperature and boiler size. Ontario Heat Loss delivers certified calculations and designs in 48 hours.
Certified CSA F280 heat loss report — $395, 48h · Full HVAC design & mechanical drawings — $695
